Monday, August 31, 2015

Marvelous Designer Part 2: Taking the guess work out of pattern making

I've recently had some requests on how I use the 3d clothing tool Marvelous Designer by Clo3D.
I'm publishing a talk I gave to the students of DigiPen last year on my workflow. I developed this workflow for the game Sunset Overdrive by Insomniac Games. My job at Microsoft Studios was to teach the artists at Insomniac how to incorporate Marvelous Designer into their pipeline by creating sample pieces of clothing and doing on site demos and one on one training.
 
This paper assumes you have already read my intro to Marvelous Designer. You can find Part one on my website: http://www.joelmongeon.com/Whitepage.html

I'll also post a few images of the working examples I created for Insomniac and how I used Marvelous Designer to Simulate armor. If you have any questions feel free to ask in the comment section or send me and e-mail.

Enjoy!

Marvelous Designer workflow


Joel Mongeon

 
6/9/2014
 
 This guide is not a replacement for the Marvelous Designer manual.
It is assumed that the reader is familiar with Marvelous Designer and basic modeling and unwrapping techniques.
 

REF


To begin designing a pattern, you need to look at real world examples of how the particular piece of clothing is constructed. In the case of jeans I found the above examples to use as guides.
 

DCC BLOCK OUT


 Inside of my DCC app I blocked out the jeans keeping in mind where the seams would be if this were a real garment. The block out does not need to fit perfectly, just be a general guide for how the model will fit the avatar and where the pattern will be split.
I went ahead and also modeled the extra cuts I would need for the final pattern. I decided to add belt loops directly in Marvelous Designer without pre modeling in my dcc.
 

UNWRAP BLOCK OUT


 When I am happy with the block out, I then unwrap and relax each panel that I identified from my reference using my dcc app’s automatic unwrapping tools. The resulting UV map shown above is what I will use as a template inside of Marvelous Designer.
I make sure to unwrap and relax the UV’s without any manual intervention. I have found that if I force a shape in UV space, my pattern will not drape correctly on my avatar!
 

CREATE A YARD STICK


The final step to creating a pattern that fits your avatar is to create a digital yardstick. I usually create a single polygon the height of my avatar. When I pack my UV’s I include this yardstick so that the size of the pattern and yardstick match each other relative to their size in the 3d viewport.
I now export a snapshot of my pattern and yardstick UV’s as a jpg file.
 

LOADING PATTERN INTO MARVELOUS DESIGNER


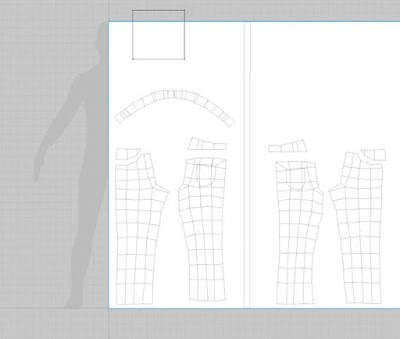
In Marvelous Designer I load in my avatar model and begin a new garment. I first create a square pattern that you can see in the top right of my avatar silhouette. This square is purely there so I can apply my UV guide as a texture map.
I then apply my pattern jpg as a texture map to the square pattern. Since I know the yard stick is the height of my avatar, I scale up my texture map until the top and bottom of the yardstick matches the top and bottom of my avatar’s silhouette.
Since the square pattern is only used as a reference, I disable the pattern in the 3d viewport so that it does not simulate when I am testing my actual patterns. To disable a pattern, right click on it in the 3d viewport.
 

MARVELOUS DESIGNER BASE PATTERN


 I can now trace over the pattern I created in my dcc app.
I tend to use as few points as possible to create my patterns and heavily use the Edit Curve Point (V) tool to shape my 2d patterns to my pattern image.
At this point, since I already know the shape and size of my pattern it is easy to sew and drape my base onto the avatar. Pictured above is my very first drape of the base pattern. As you can see it fits the avatar perfectly and takes any guess work out of the pattern generation.
I also specify the type of fabric I am using for this garment at this stage. In this case I use the denim preset provided by Marvelous Designer.
 

ADD BELT LOOPS AND POCKETS


I decided to next add details to my basic patter including belt loops and pockets. The 2d patterns for these were drawn freehand in Marvelous Designer.
I used internal lines drawn on the original patterns for sewing purposes.
 

ADD FOLDS AND DETAILS


I next tackled the creases of the garment by adding internal lines and adjusting the fold strength of them and sewing edge folds.
 
 
 For the final fold settings I used a Fold Strength of 10 and Fold Angle of 235.
 

FINAL 2D PATTERN


 Here is an image showing my final 2d pattern in Marvelous Designer.
 

FINAL 3D GARMENT


Here is the final garment in Marvelous Designer ready for exporting and detailing in Zbrush.
 

FINAL 3D GARMENT


Final Zbrush sculpt of Marvelous Designer Jeans


Sunset Overdrive clothing:


Tuesday, November 11, 2014

All things Halo

Today Halo: Master Chief Collection is available on Xbox One. The Master Chief collection includes all four Halo games, with a remastered Halo 2 anniversary edition, Halo: Nightfall (a new digital series), and access to the Halo 5: Guardians Multiplayer beta!


I am very pleased to have contributed to Halo 2 Anniversary while I was at Microsoft Studios. I was responsible for creating the in game Master Chief and Hunter. Halo 2 Anniversary, and indeed the whole Master Chief Collection, looks great. I can't wait to pick up my copy and start playing!

Master Chief © Microsoft
Model, textures, pose and render by Joel Mongeon
Created using modo, dDo, Photoshop, Marmoset Toolbag


Hunter © Microsoft
Model, textures, pose and render by Joel Mongeon
Created using modo, dDo, Photoshop, Marmoset Toolbag

Part of my job as Senior Artist at Microsoft Studios was to investigate new and innovative tools and techniques to share with our partners. I modeled Master Chief using a 3D modeling package called modo created by The Foundry. I also modeled the Hunter using modo and a brand new plugin called MeshFusion.  The following review was written as an overview of MeshFusion for video game artists. I hope you find it interesting and makes you want to give MeshFusion for modo a try.

MeshFusion review 
Creating amazing shapes with ease 

Joel Mongeon 
9/15/2014 

This will be an overview and review of MeshFusion which is a real-time Boolean plug-in for the Foundry’s modoMeshFusion was created by the team that created the stand alone modeling tool Groboto.  I used the Hunter from Halo 2 anniversary as a test case for using MeshFusion in production. Aside from a few small issues I will detail later, using MeshFusion made modeling the armor for the Hunter very easy and enjoyable. I found as long as I broke down each part into simple base shapes, I was able to quickly build up a complex models. 

Hunter armor from Halo 2 Anniversary 

In this example I modeled a very simple boot shape. I then created two “cutter” shapes for the front and back of the boot. As you can see in the after image, the Boolean operation created a very clean cut along the front and back of the boot. If I were to do this with a box modeling approach I would have to worry about beveling edges and edge loops to maintain a sharp edge without affecting the surface of the underlying boot shape. MeshFusion visually shows how the Booleans are created with either a nifty 3D tree in the viewport or with a node based schematic view. The nice thing about this visual queue is that you can drag and drop new items into it or re-arrange how items contribute to a Boolean operation, everything remains live and editable. You can even alter the base shapes and everything up the Boolean chain will update.


Simple shapes combined to create complex results 

Here is a close up of the resulting mesh. You can see MeshFusion tries to keep the topology from the individual mesh items as much as possible. There are strips of triangles around the Boolean strip, but when you turn off wireframe in your viewport the model renders smooth.

Results in wireframe and viewport smoothing 

Here is my completed boot using MeshFusion. You can see all the various parts that make up the Booleans with the 3D trees. Each tree is still live which means I could go back and re-arrange areas so that they all work well together.

View of final boot with MeshFusion 3D trees

I use the resulting MeshFusion mesh strictly as my high resolution model and retopologize my game model on top of that. The MeshFusion model is then used for baking Normal, AO, Surface ID and Cavity maps that will later be used for texturing purposes. 


Final game mesh

The Good 

  • MeshFusion works with subd models:  MeshFusion works with any subdivision model that is comprised of quads. N-gons are not supported and tris will slow things down considerably. MeshFusion also ships with over 40 preset meshes that can be mixed together. 
  • Real-time Booleans: Creating a Boolean with MeshFusion is not a destructive operation. Each Boolean remains live and each item that makes up a Boolean can be altered at any time. You can also change how an item contributes to a Boolean operation by dragging the preview item in the tree view or schematic view. Items can be additive, subtractive or intersect. 
  • Edit strips: Each intersection created by a Boolean gets a control spline created for it. These control splines lets you edit the width, profile and smoothness of each intersection. 
  • Output watertight mesh: The final mesh output from MeshFusion is watertight. This is ideal for baking clean normal maps. Watertight meshes are also a requirement for 3d printing which might be useful to some modelers. The transitions between the original mesh and Boolean does tend to add strips of triangles, however that does not really matter as the shading normals come out perfectly smooth. 
The Bad 

  • Denser mesh creates smoother results: This is not a huge concern of mine, but I have found that some mesh items do need to be subdivided once or twice to create a nice result in MeshFusion. Since I use MeshFusion models as my high poly mesh, the polycounts don’t really matter. However, scenes do tend to get large with huge amounts of MeshFusion models. So how you manage your scene/s becomes important. You may want to split different parts of your model into separate files to keep files sizes down and interactivity up. 
  • Small holes in final mesh: I have noticed the odd missing triangle on some of my final MeshFusion items. This is easily fixed by selecting open borders and filling them with a polygon. Newer versions of the plugin should correct for this. 
  • Item organization: MeshFusion does not do any automatic grouping of mesh items for the user. This is probably my biggest complaint about the plugin. I end up with a few hundred mesh items in my scenes which took a while to manage. I would prefer if MeshFusion took items that comprise a MeshFusion Boolean and group them together. 
  • Price: MeshFusion is not a free plugin, it costs $395 on top of the price of modo. Depending on how often you do hard surface modeling, it might be too pricey. 

This review is (c) of Microsoft Studios


...Finally, to keep this a 3D printing blog:

Here are some photos of Halo 2 Anniversary's Master Chief helmet printed on a Form1 printer.


Thursday, November 6, 2014

Accidents happen

Crash!!!

"Oh no! I was going to bring that to a meeting with Phil Spencer next week."

The Herker model from Insomniac's latest game Sunset Overdrive had been proudly displayed on the publishing art director's shelf all week when suddenly tipped over and fell 4 feet to the ground. The art director's meeting was on Wednesday where she would be showing it to her peers and executives. The guys at the model shop had gone home for the weekend, the print itself took almost two days to print, and it cost quite a bit of money in materials. There was no way we could print a new one in time.


Herker model digitally sculpted by Maxence Fleuret from Insomniac
Posed and prepared for printing by myself
Printed on an Objet500 Connex at Microsoft model shop

"No problem Louise, I'll fix it over the weekend and you'll have it back in no time" I said.

I collected up as many pieces as I could find on the floor, carefully put them into a box and quickly drove home to get started. This was Friday evening and the art director needed a Herker model by Wednesday morning.

I had a plan...

CX5

I had recently backed a Kickstarter project by the amazing sculptor Adam Beane for his new sculpting material called CX5 and had an unopened package of it waiting to be used. I thought this would be a great time to try it out on the parts that were either too damaged or missing on the broken Herker print.

I carefully started gluing large pieces together on Friday night using super glue. I wanted to make sure the glue was fully cured so I waited a few hours before gluing more than two pieces together.

Starting to glue broken bits together with super glue

More parts glued together

So many pieces!

That's about as good as it gets with superglue

By Sunday morning I had glued as much as I could together and decided I should really test CX5 out before going any further. The Microsoft model shop had given me a few rejected polyjet parts to play with and I thought gluing them together with CX5 would be a good enough test.

CX5 in a skillet to warm it up

It turned out to be more of a challenge to sculpt with CX5 than I had thought. This was my first foray into sculpting with hot tools, so I had a lot to learn in a short amount of time. What I found most challenging about the medium was the working temperature. One second CX5 is scalding hot and burning my fingers. Then it cools off slightly and behaves like a hard oil based clay. Then a few seconds later it is rock hard again. 

What I was hoping to do was heat up the CX5 to a liquid state and then thinly brush it onto my parts. Unfortunately, because it kept cooling too fast, I ended up with thick gobs of medium on my parts and the rest just stuck to my brush. The stuff on my brush is rock hard and I'm not sure if heating it will melt the clay off or just burn the bristles of the brush.

The dvd that came with the CX5 was incredibly useful in getting me up to speed on how to work with CX5 and what equipment is needed. I ended up buying a small electric skillet to keep the clay warm. I also bought an alcohol torch that I filled with denatured alcohol so I could heat up my metal tools and 3M sanding sponges. I have since picked up a dental waxer but have not yet had a chance to use it.

Finally, after a lot of hand sculpting and sanding I had glued the two parts together with a smooth to the touch seam. It was time to get to work on resculpting the missing Herker parts.


Testing of CX5

The area that had the most damage and missing elements was the giant backhoe claw hand. That is where I spent most of my time resculpting. I began with using some two part epoxy putty to cement the tip of the claw to the rest of the hand. I used epoxy because when it cures it is incredibly strong. This took up a few hours on Sunday evening so all of my sculpting would have to take place at home on Monday.


Superglued parts

Completed epoxy work. That hand is rock solid!

Monday morning I began working with CX5 in ernest. After my initial tests the previous day, I knew this would be a challenge but I was still confident I could get something presentable done in a day. I started out heating the CX5 in a skillet until is was maleable. I quickly massed out the missing forms with some of my sculpting tools. Using an alcohol lamp with denatured alcohol to heat up the metal tips of my tools I worked with CX5 in short bursts until the tool tip cooled too much. I would then heat the tip up in the flame to continue working.

Initial sculpt of hand using CX5

I then used hot sanding to start polishing the parts and blending it together with the original 3d print. Hot sanding is where you heat up sand paper using your alcohol torch before sanding the medium. The hot sand paper quickly smooths the clay, creating a uniform and smooth surface. 

I bought 3M sanding sponges directly from Adam Beane but also tried out emery boards that are used for manicures. I cut the emery on angles (pictured above) so that I could create more mechanical looking planes in small hard to reach areas.

Polishing CX5

More polishing...

Finished resculpt of claw

I discovered why the Herker had fallen over in the first place. The pins that attached the feet to the base were never glued. The model is so top heavy that eventually the pins popped out of the base and the whole thing took a nosedive. So next time I have a heavy print to deliver I'll make sure to glue it securely to its base. With the claw fixed on the print, it was time to attach the large sections of the print together. This time I used a liquid epoxy to fix the parts together and waited for it to cure before continuing.

drill holes on base for better adhesion with epoxy

drill holes on foot for better adhesion epoxy

Epoxy the feet to the base. That print is never going to come off of that base!

Epoxy the arm to the body

Epoxy the arm to the body

There were a few seams and cracks left on the model which I quickly smoothed over with some more CX5 late into the night on Monday.

laying down some CX5

After smoothing CX5

Other view after smoothing CX5

Once the Herker was put back together I had to carefully pack it up with lots of foam. I definitely could not afford to fix anything else as it was now Tuesday morning and I still needed to paint the model and let it dry.

Very careful not to break this print!

The model shop at Microsoft has a great spray booth room that I was able to use. I took the fixed model back there and sprayed the whole thing with a matte grey car paint primer. All I had left to do was wait for the paint to dry and get it back to the art director before her meeting.

With car paint primer

Very cool sculpt by Maxence Fleuret!

Look at all those amazing details pop!

The end result is a seamless fix. I was able to get the Herker back in time and as an added bonus, the matte car paint greatly enhanced the details of the sculpt. The original polyjet material is quite translucent which means most of the details were hard to make out. The Herker 3d print now proudly sits in the display case at Microsoft Studios.

As for CX5, I have mixed feelings towards it. On one hard it is very versatile, it can be sculpted, machined, painted and sanded. It can also be cast directly without the need for doing a lost wax copy. On the other hand, the small window in which the medium is workable made it difficult for me to really enjoy working with the clay. I'm sure I just need more than a days worth of practice to be comfortable with CX5. I've also picked up some of Adam's new CX5s which is a softer version of CX5. I need to try them both out and see which I prefer.

Since this project I have also picked up a block of sculpting wax and some modeling epoxy upon the recommendation of some other traditional sculptors. One day I'll get around to trying out these other mediums to see which one works best for my needs. In the meantime I hope none of our other 3d prints have any accidents.

Broken 3D print? I have no idea what you are talking about...


Looks good to me!